So after 60 days of dealing with an inspection, roof issues, insurance, cranky sellers, appraisals, and all the other joyous things that go along with buying a house, we FINALLY closed on December 28! This is technically my 2nd house, but its exciting because its my first official house with Tyler (and Tyler's very first house, I'm so excited for him!) So now that we have the keys in our possession, its time to start on the long list of projects we have to get done (hopefully) by January 26. Wish us luck.
Project #1: Changing the locks
They say the very first thing you need to do once you get the keys, is get new keys. Sounds easy enough, right? O.m.g. this was a ridiculous project. Here's how it went. First of all, we inspected the doors. All of the doors in the house have brass knobs, which WILL be changed, but we figured we should start with the ones that lead outside first. We had five locks to change - one to the front door, which is a big one, and then 4 other doors. Well, the front door also had brass kick plate, brass mail slot, brass door knocker, so of course we have to switch those out too. We went to Lowe's to pick out our locks. So many choices, so much $$$. For future reference, locks are expensive!!! Luckily we had two Lowe's gift cards cause our grand total was just under $500. Yikes.
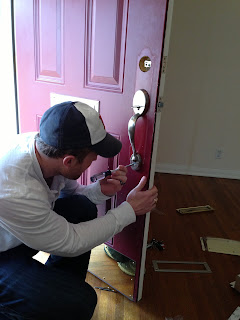
We decided to start with the front door. Now - I've had my fair share of locksmithing with the lock on our front door of the townhome. I've taken locks apart, put them together, replaced them, super easy. We took all the screws out of this nice brass Baldwin lock, and that sucker would not come off. We start pulling and wiggling and nothing would give. We were convinced that it was super glued to the door. I then had the brilliant idea to use Google to see "how to remove a Baldwin lock." Google has all the answers. Apparently you have to use an allen wrench, which we luckily had. We finally got the lock off the door, only to discover it had another lock on the inside. There was no messing around with this lock! We finally got the entire thing off, and we were ready to put the new one on:
A few hours later, we finally got the whole thing done. Next, we were onto the other doors. These doors had a knob and a deadbolt, so we had two tasks to do per door so we divided and conquered. Luckily, these weren't as difficult as the front door, but there were a lot of parts per door that we had to deal with:
Many hours later, we finally finished. It took WAY longer than we expected, but it was an important first thing to do. Here are a few things we learned:
1. Try to change the locks when the temperature is above 32 degrees Fahrenheit. No, not because the temperature affects the lock, but since we had to have the doors open, our fingers were FREEZING make the whole process even that much more painful.
2. Decide whether you like the current locks/knobs that are already existing. If you like the locks, you can just keep them and have a locksmith come out to re-key. If you don't like your locks, be prepared to chunk over some serious change because locks are expensive. At least try to find a coupon before you make the purchase.
3. If you change all the locks yourself, set aside a few hours to change all of them, because it takes some time to change out every single part. And you may have to deal with some crazy serious double locks like we did.
First project - complete!


you are bound and determined to make Tyler a handyman and I love it - his upbringing gave him zero of these skills but you will get him there! bravo!
ReplyDeleteI think he WANTS to be a handyman! My dad taught him how to use the circular saw and he thought that was super cool, and I mentioned that he should take some home improvement classes at Home Depot and he seemed game!
ReplyDelete